This French dessert wows visually, but very simple to put together. Without a doubt French patisserie fruit tart recipe is my most favorite desserts of any French pastry. If you like this dessert try our French apple tart, Tusenbladstarta and blueberry crostata!
Recipe Summary
🥧What is it?
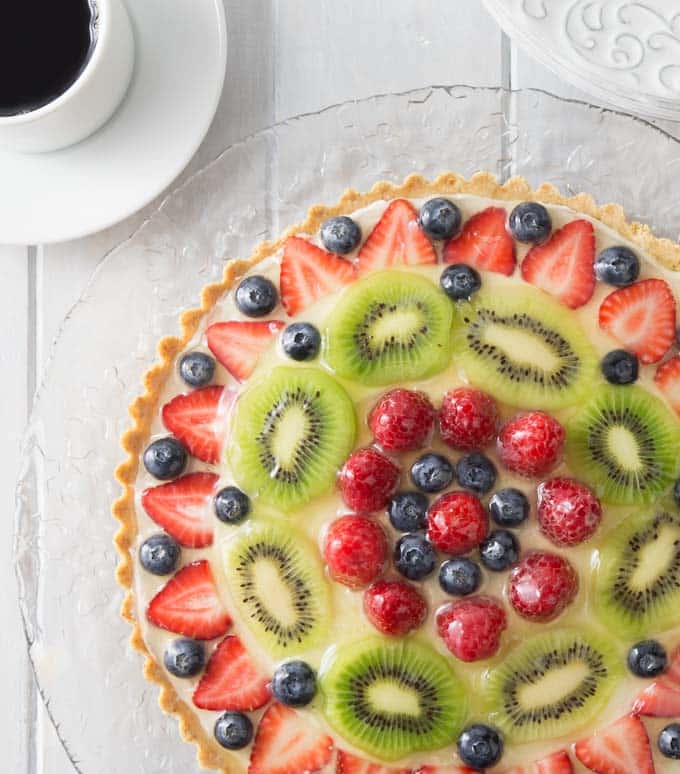
A classic French patisserie-style fruit tart - a buttery shortbread crust filled with a smooth, vanilla-scented cream and crowned with glossy fresh berries and kiwi. Bakery-window beautiful, made in your own kitchen.
❤️Why you'll love it?
Just four simple ingredients for the filling, no fussy pastry cream to temper, and the crust and filling can be made ahead. It's a stunning, crowd-pleasing dessert that looks like it came from a Parisian bakery.
👩🍳How do you make it?
Press an easy shortbread crust into a tart pan and bake until golden. Whip cream cheese, heavy cream, sugar, and vanilla into a silky filling and spread it in. Top with strawberries, blueberries, raspberries, and kiwi, then brush with an optional glaze for shine.
What do you need to make a French patisserie fruit tart?
You only need to make four simple ingredients to construct this tart and I will show how, step by step. The glaze is optional and you can make the tart shell and cream filling in advance.
Tart shell: Super simple in the food processor and then press and bake into a tart pan.
Fruit: Get the freshest strawberries, blueberries, raspberries and kiwi.
Cream filling: This will have you licking the spoon and beaters it is so good!
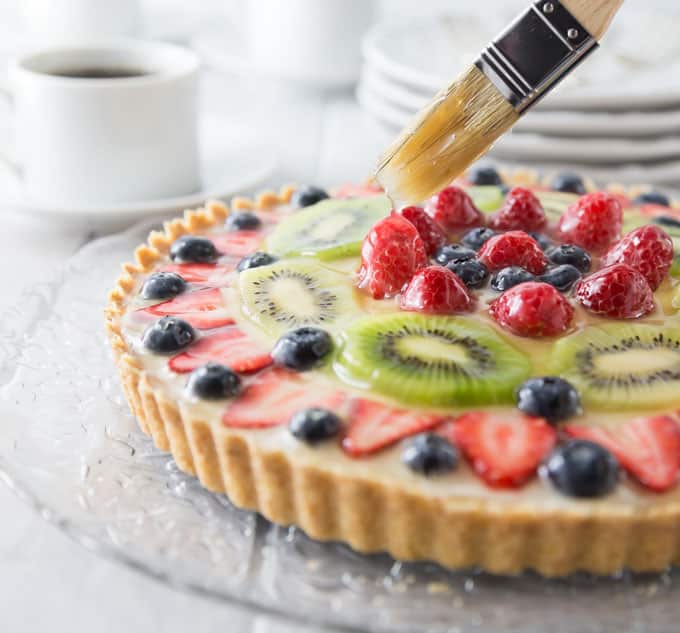
Glaze: Brush over the fruit for a stunning finished look of shimmering fruit!
Tart pan: I like to use one with a removable bottom.
Food processor: This is to blend the ingredients together for the tart shell crust.
Stand mixer or hand beater: Blends the cream filling together until it is silky smooth.
My favorite grocery store in town started offering it about 10 years ago. The price kept going up to the point that I refused to buy it anymore. And thus, it became my mission to try to figure out the recipe. I finally did it. You basically prepare a vanilla cream made using cream cheese, heavy cream, sugar, and vanilla. That simple! It is like creme patisserie (thick pastry cream), and much lighter.
Tips for success:
A popsicle or chopstick can level out your shortcrust bottom to help you build thicker sides. Think shortcrust zen garden.
Pack the edges tight with your fingers and use a water glass for the bottom part. This will keep your crust from crumbling.
For a silky smooth creme filling: let the cream cheese and sour cream come to room temperature before blending so there are no chunks.
How to make a shortbread crust tart shell.
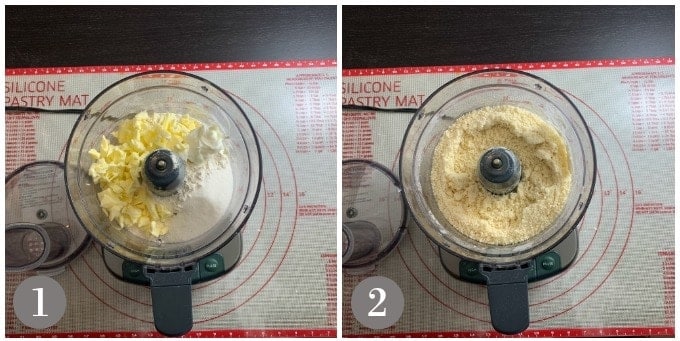
Step 1: Preheat your oven to 375° F degrees. Place all the crust ingredients in a food processor.
Step 2: Pulse the food processor until the it starts to look like corn meal and is well combined.
Step 4: Press the middle of the mixture into the tart pan or you can use a flat bottom water glass. Press firmly to get a tight crust.
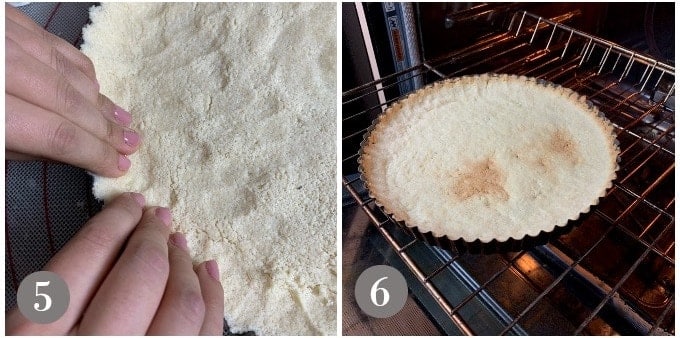
Step 5: Work the side up to the top edge of the tart pan and press tightly with your fingers.
Step 6: Bake the crust in a 375°F degree oven for 15 minutes or until golden brown around the edges. While the crust is baking I like to make the glaze so it can cool down before we assemble the tart.
Making fruit tart glaze
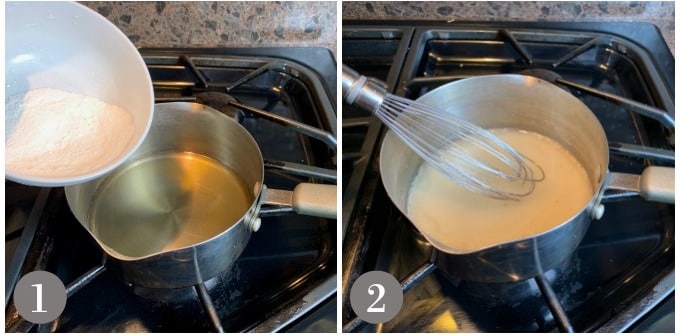
Step 1: Combine the sugar and cornstarch on a bowl then heat the apple juice in a small sauce pan. Once it starts to simmer add the sugar cornstarch mixture.
Step 2: Whisk the mixture into the apple juice and bring to a boil and cook for two minutes until thick.
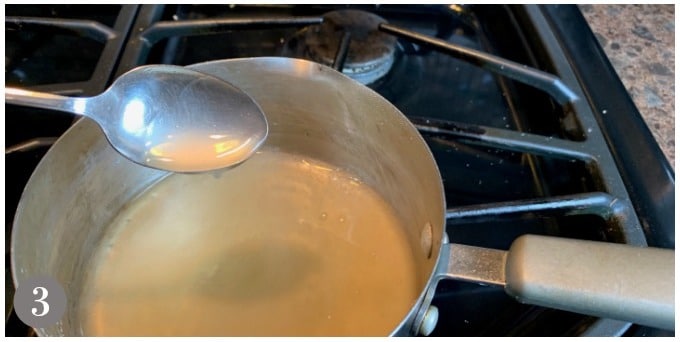
Step 3: Check the thickness with a spoon for nappe consistency or it coats the spoon. Once thick allow it to cool.
Making fruit tart pastry cream and assembling the tart
After the tart shell and is done we can work on the cream filling and assemble the tart.
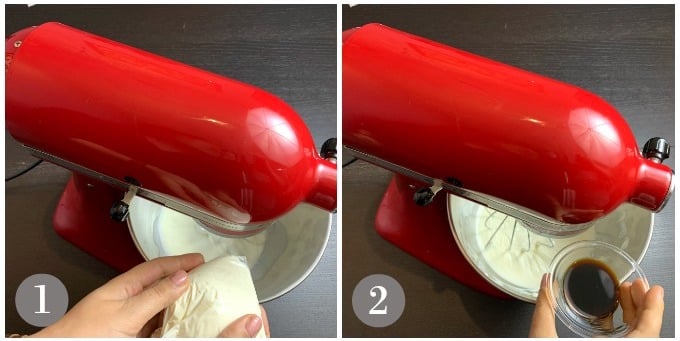
Step 1: Be sure the heavy cream, sour cream and cream cheese are all at room temperature. This will make a silky smooth vanilla cream filling. Add the heavy cream first to the mixing bowl and blend on medium speed for 2 minutes. I like to put the sour cream and cream cheese in a zip top bag, cut the corner and squeeze it into the cream a little at a time and keep mixing after you add it.
Step 2: Add the vanilla.
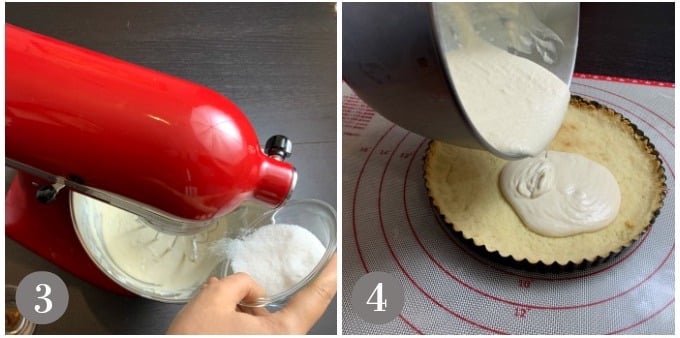
Step 3: Add the sugar. (If you have sugar that you store with a vanilla bean this is even better. I call it "vanilla sugar" just for baking projects like this.)
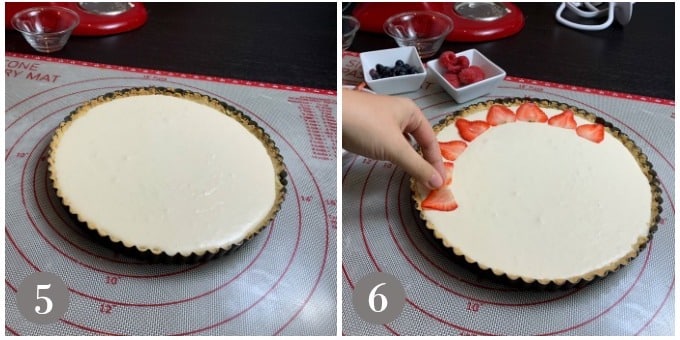
Step 4: Pour the cream into a cooled tart shell. Make sure the cream is level and you can jiggle it a bit to get it level.
Step 5: At this point I like to put the tart into the refrigerator for 30 to 45 minutes until the cream is set.
Step 6: Arrange your sliced fruit around the cream.
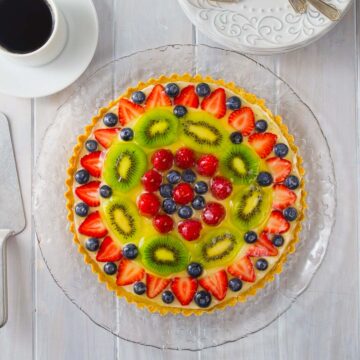
Step 7: Add all your fruit slices and behold your masterpiece!
Step 8: Brush on the glaze over the fruit for a beautiful shiny finish. The glaze also keeps the fruit from looking dry if you store it in the refrigerator until it is time to serve.
Frequently Asked Questions
Can I freeze the tart shell and make the tart later?
Yes, once the tart shell has completely cooled you can freeze for up to 2 months.
Can I make this tart the day before?
Do not construct the tart until you are ready to serve or a few hours before serving. The tart shell would get a bit soggy if you made it the day before. You can make the tart shell ahead, bake and freeze for up to 2 months once cooled. The vanilla cream filling can be made ahead and stored in an airtight container in the refrigerator for up to 3 days. The cream filling does not freeze well so avoid that. The fruit needs to be cut up and placed on the tart while fresh. You can make the glaze ahead and store it in the refrigerator in the same manner as the cream filling. You will need to heat it a bit in the microwave until it is warm enough to spread on the fruit with a pastry brush. Chill the glaze after brushing it on.
How long can I keep the finished tart in the refrigerator?
It is best to eat this tart fresh after it is constructed. It will last for 1-2 days in the refrigerator but the crust will start to get softer. I usually try to serve within 5-6 hours of constructing the tart and leave it to chill in the refrigerator.
Do I have to let the tart shell cool before adding the cream filling?
Yes, is it best to allow it to completely cool. Chilling the filled tart it in the refrigerator will help the cream set before adding the fruit.
Can I remove the shell from the pan and fill?
No, leave the tart shell in the tart pan while you construct the tart. Use a tart pan with a removable bottom disc and leave it in the pan until you are ready to serve. Pop it out of the pan and place it on a platter leaving the bottom pan disc in place. You can glaze it while on the platter or before you remove it from the tart pan.
Why did my tart dough turn into a ball?
You likely over mixed the dough in the food processor. Be sure to stop pulsing the dough mixture as soon as it looks like a granular fine meal.
What is the pastry cream made of?
Our version is made from cream cheese, heavy cream, sour cream, vanilla, and sugar. Don't be shy about adding the suggested sour cream. It adds a little tang to the rich sweetness of the pastry cream.
A deliciously refreshing French style patisserie tart with a sweet shortcrust, cream filling topped with fresh fruit and glazed for added effect. Delicious!
Place all crust ingredients in a food processor and process until it looks like cornmeal. Press mixture into a 10" tart pan and bake for about 15 minutes or until golden brown.
Prepare the Cream filling:
Be sure the heavy cream, cream cheese and sour cream are at room temperature for a silky smooth cream filling. To prepare the cream filling place the heavy cream in the bowl of a stand up mixer and blend for about 2 minutes using a whisk attachment. Slowly add the sour cream, cream cheese, sugar and vanilla. (I like to put the cream cheese and sour cream in a zip top bag, cut one corner and slowly squeeze it into the heavy cream.) Continue mixing until the mixture is smooth.
Prepare the Glaze:
Combine sugar and cornstarch in a bowl. Heat the fruit juice on medium, and slowly start adding in the sugar mixture when it starts to simmer while stirring constantly.
Bring the glaze to a boil, continue stirring, and allow it to cook for about two minutes, or until thickened. Remove from heat and let it cool for ten minutes before using.
Assemble the Tart:
Assemble the tart by first filling the crust with vanilla cream, then arrange fruit in an artful way on top of the cream. Brush with glaze. Tip: I like to put the cream into the crust then chill it in the refrigerator for 30-45 minutes until it is firm and set. Once it is set then I arrange the fruit and brush on the glaze.
Notes
The crust: Here are some tips and tricks that I have found helpful in making a great fruit tart. When I have combined the ingredients for the short crust I drop the crumbly meal right into the 10 inch tart pan and level it out with a chop stick or popsicle stick. This gives me an even layer across the bottom and lets me build up the sides thicker. It reminds me of playing in a sandbox, or watching workers who are leveling fresh concrete with a long board. Anyhow, I draw the stick across the bottom and deposit the extra meal around the sides. I then take a flat bottomed water glass and gently tamp down the crust to pack it tight, and I usually work the edges with my fingers. Be sure to pack it tight so it is not crumbly after baking.Cream filling: The next tip is for the cream filling to have a really smooth consistency. Be sure you let the cream cheese and sour cream come to room temperature before blending together.Frequently Asked Questions:
Can I freeze the tart shell and make the tart later? Yes, once the tart shell has completely cooled you can freeze for up to 2 months.
Can I make this tart ahead? Do not construct the tart until you are ready to serve or a few hours before serving. You can make the tart shell ahead, bake and freeze for up to 2 months once cooled. The vanilla cream filling can be made ahead and stored in an airtight container in the refrigerator for up to 3 days. The cream filling does not freeze well so avoid that. The fruit needs to be cut up and placed on the tart while fresh. You can make the glaze ahead and store it in the refrigerator in the same manner as the cream filling. You will need to heat it a bit in the microwave until it is warm enough to spread on the fruit with a pastry brush. Chill the glaze after brushing it on.
How long can I keep the finished tart in the refrigerator? It is best to eat this tart fresh after it is constructed. It will last for 1-2 days in the refrigerator but the crust will start to get softer. I usually try to serve within 5-6 hours of constructing the tart and leave it to chill in the refrigerator.
Do I have to let the tart shell cool before adding the cream filling? Yes, is it best to allow it to completely cool. Chilling the filled tart it in the refrigerator will help the cream set before adding the fruit.
Can I remove the shell from the pan and fill? No, leave the tart shell in the tart pan while you construct the tart. Use a tart pan with a removable bottom disc and leave it in the pan until you are ready to serve. Pop it out of the pan and place it on a platter leaving the bottom pan disc in place. You can glaze it while on the platter or before you remove it from the tart pan.
Why did my tart dough turn into a ball? You likely over mixed the dough in the food processor. Be sure to stop pulsing the dough mixture as soon as it looks like a granular fine meal.
Looks so delicious!!! Thank you for sharing. I still have my freezer full of berries, so now I got good recipe, were to use 🙂 http://www.estoniancuisine.com
What a great option for Easter weekend Brunch or even as dessert! When I was in Paris last Spring, I ate my weight in Fruit tarts. This one looks like it is right from Centre-ville!
Hi Michelle!
The crust is actually very easy to make because you just kind of fit it into the pan. The texture will be "mealy", but once it is baked, it all comes together. I think you'll be fine.
How gorgeous! I usually buy fruit tarts (or slices, to be exact) from bakeries and have never attempted a whole one at home. That apple glaze looks like something special. 🙂
Hi Annie! Thank you. I hope you try it out, it's not hard to make at all.
I will try to visit you guys at Mamma Tech. I might be interested in guest blogging. 🙂
Oh Analida, that is just a work of art! My mother used to make something like this but it was not a pretty as yours. I wish I had a piece in front of me right now!
Every ingredient in this recipe is simply amazing! You have done a fantastic job Analida and I just want to thank for inspiring me to make a very special weekend! 😉
I am trying this now.... You mentioned that you can make the pastry and the cream a day ahead... I assume you keep them separate and assemble the next day? ....OR do I pour the cream mixture on the crust and refrigerate overnight and add fruit and glaze tomorrow?
You are welcome Mary! Thank you for the kind comment. I am so happy that you and your guests enjoy my Patisserie Tart. It is a favorite at our house too. 🙂
Abby @ WinsteadWanderingsays
This is a gorgeous tart! I would love to serve this for a fun fancy dessert.
OMG! Tried it yesterday and it was an absolute HIT.... Our new fav dessert! Thank you for posting this one. You are right, half of the glaze was perfect for the whole 10" tart. We LOVED it! Our company went NUTS over it!
Everyone... TRY this one... It is SO EASY to make and really delicious!!!
Now that is what I call a show stopper!! It is absolutely gorgeous and the flavor sounds wonderful. The artistic arrangement of the fruit is the ideal finishing touch. The filling is a great compliment to the fruit. I'm glad the store charged you what it did, you figured out the recipe and shared it with us.
Thanks Marisa! It took a while to arrange the fruit to look that way, but I think it was worth it.
Yes, if the store had not hiked up the price so much, maybe I would still be buying it.:) I guess my
investigative work paid off.
These fruit tarts (minus the glaze) are my absolute favorite dessert! Totally agree on the prices being nuts at the grocery store (especially you, Whole Foods) - you did a beautiful job making your own!
Hi Julie! My daughter doesn't like the glaze either 🙂
Yes, the grocery stores are making 300-400% profit on these tarts which really don't take too much time to make or are expensive to prepare. Thanks for the compliment.
This tart is just gorgeous, I love the way you arranged the fruit on top, and your suggestions for getting the cream filling just right. How great for entertaining, too, to be able to get a big head start the day before. Pinning this for sure!
Thanks Monica! Yes, this is perfect for entertaining. It's pretty easy to make, especially because like you said, you can get a head start the day before. Thank you for pinning.
Hi Valeria. If you have a tart pan, all you do is remove the bottom circular piece from the rest of the pan.
If you don't, then you need to cut it like you would a regular pie.
Yes, definitely wait for it to cool before you fill it. Let me know if you have other questions.
This crust is perfect!!! (And the filling, too!!) I've made this recipe 3 times now, and each time (even with oven dramas and measurement woes) the tarts came out perfectly! Thank you so, so much for sharing this fantastic recipe.
Sandra, you can make the crust, slice the fruit, and the filling the night before. I would not put them together. Assemble on the day. Also make the glaze the day you are serving. Hope this helps.
On step 3, when you say to blend the heavy cream for 2 minutes in a stand up mixer, do you mean something like a kitchenaid stand mixer? If so, would the whisk attachment or beater attachment be preferable? Is the goal to make whipped cream essentially? Thanks!
Hi Dennis! Yes, I mean like a Kitchenaid stand mixer. You do need to use the whisk attachment because in essence you are making whipped cream. You are so welcome. Thanks for asking. 🙂
I am new to baking, pastries, and desserts other than some simple cookies and a good cake. I cannot thank you enough for making this recipe easy enough for someone like me. I felt so proud after making it. I made it for a dinner party and received so many compliments on it, thanks to you and your lovely recipe. Your recipe was easy to follow and not only did it turn out incredibly delicious but beautiful too. You have inspired me to be braver in the kitchen. You said it took you a little to get it right and sometimes I forget that trial and error are what make us better bakers. I was a little intimidated to try something like this but am so glad I found you! Thank you again.
Hi Mrs. Schaffer! Thanks so much for commenting. I am so happy you like the French patisserie fruit tart, and that it turned out so well for you. I am also glad you thought that the recipe was easy to follow, I always strive for that. I am so excited that you want to try more recipes. Indeed trial and error are key! I am also glad your guests enjoyed it. 🙂 Thanks again for the compliments. Have a nice evening.
Hi, totally new to baking so I thought this crust would be more technically difficult. Bookmarked your recipe over a month ago because I want to make this for Easter. Well, today I made my first practice run! Before I even put it in the oven I was perplexed as to how to press it evenly, especially along the sides. I've made dozens of cheesecakes so I've pressed in crusts before, but obviously this is much finer of a crust & the pan less forgiving. It came out as I thought it would: uneven, browned & cracked close to the middle in an area of about 4 inches. The sides: uneven, crumbling, breaking everywhere. I'm gonna put cream in it anyway since it's just for the husband & kids.. but I have a week to perfect this or I need to change plans! Thanks for listening, please advise!
Hi Haley! I would be happy to give you some advice. When you are packing the crust, make sure that you leave the sides a bit thicker. It will shrink a bit. Also, I use a tart pan with a removable bottom. It makes things much easier. Does this help?
I came across this recipe yesterday and wanted to give it a shot. I made it for my family Easter brunch and it was fantastic. I had some slight cracking of the crust but nothing severe. Everyone was super impressed and they were only sad I didn’t make a second one. Thank you so much for your work with this.
You are welcome Shaun! I am so happy that you and your guests liked it. Yes, this is a very impressive dessert, and it is not that difficult to make. So glad it turned out well for you. Happy Easter to you and yours.
Hi there. I recently modified this recipe to individual mini tarts for a work luncheon and it was a big hit. Definitely plan to make this again. I did have some trouble with the cream and ended up tossing an entire batch after the cream cheese wouldn't fully incorporate and the whipped cream got super overwhipped while I was still trying to get it all mixed in. Second batch I altered the order of ingredients as they were added to the mixer and it turned out beautifully. Instead of starting with the cream, I started with the cream cheese. Creamed that with the vanilla, sour cream, and sugar until smooth then added the heavy cream and whipped for approximately 2 minutes. The cream whipped up perfectly even after incorporating into the cream cheese. Just wanted to share in case anyone else ran into the same problem I did.
Thanks for sharing your method for making the cream, and how it helped you achieve success. Actually I really like your method. I am so glad that your co-workers liked the mini tarts. I have often thought of doing the same, and taking a batch into work. 🙂
Was I supposed to leave the crust attached to the bottom of my tart dish and serve it from there? That was unclear and I didn't want to use a knife on it so I took if off but it crumbled in places. With the filling I would follow the advice of the other reviewer who creamed the cream cheese first until smooth. I did that and then washed the bowl out, whipped the heavy cream, then mixed the cream cheese, sour cream, vanilla, sugar mixture with the whipped cream just until mixed. Lastly, I assembled this at home (looked beautiful) and then took to work with me (25 min commute) but when I got there it was beginning to melt so I think another important point would be to assemble not only day of but perhaps right before. The taste is nice but I didn't seem to find this recipe as easy as it looked. Also, I skipped the glaze just due to my own preference.
Jessica: The crust is left attached to the tart. The advice of the other reviewer is very good, and I would certainly follow it. It is good advice to make it right before especially if you are traveling with the dessert. No problem on the glaze. Thanks for the input.
I just love a vibrant fruit tart like this one. This looks so good Analida, thank you for sharing.
To change it up, I like to make it with refreshing citrus fruits.
The traditional French fruit tart does not have cream cheese. The cream cheese adds a lot of calories. The true French fruit tart uses Bavarian cream for the filling and a pate sucreé for the bread.
I'm excited to try this recipe! When you make the crust and filling ahead, should they both be refrigerated until assembled? And after you assemble the fruit the day of, should it be refrigerated until served?
Yes, make the crust, filling ahead and refrigerate. Do not add the filling until you are ready to assemble and serve. A removable bottom tart pan works really great too when plating on a platter.
Hi Rebecca,
I always use a non-stick tart pan with a removable bottom and I have never had a problem with it sticking. If you do not have a non-stick tart pan I would give it a quick spray with a non-stick spray. The removable bottom makes it so easy to move to a serving plate. Let me know how you like it.
Hi Cheri, thanks for the question. I typically use unsweetened organic apple juice but you are going to add 1/4 cup sugar to make the glaze. You want to just lightly brush the glaze over the top of the tart. Enjoy!
This turned out wonderfully! I was worried this would be more difficult than I had bargained, but that was not the case. It was beautiful and tasty, and I will certainly be making this again. Thank you for such a fun and easy-to-follow recipe!
Hi Nicole! I am so happy to hear you like the tart. I really worked hard to make this an easy and approachable recipe. Thanks so much for your compliment!
I have made this DOZENS of times now! Easy! I make the shell the day before and keep in a cake holder at RT (do not over bake), and I make the cream the day before also and put in container in fridge. The next day I fill tart with cream, start making glaze, and in the 10 min it's cooling I arrange the fruit. Voilà!!! People are always asking me to make these. I do put a little more fruit than the pic shows... I LOVE this so much.


KR says
Looks so delicious!!! Thank you for sharing. I still have my freezer full of berries, so now I got good recipe, were to use 🙂
http://www.estoniancuisine.com
Analida says
Hi KR! Thanks. Let me know if you make it and how it turns out. 🙂
Lesley Donnelly says
Sorry at what temperature will the oven be ?
Analida says
Lesley, the oven temp will be at 375'F.
Renee says
This is beautiful! I haven't made a tart in years, but will certainly be making one very soon!
Analida says
Thanks Renee! Let me know if you make mine.
Amanda (Peppers & Pennies) says
What a great option for Easter weekend Brunch or even as dessert! When I was in Paris last Spring, I ate my weight in Fruit tarts. This one looks like it is right from Centre-ville!
Analida says
Thanks Amanda! I love fruit tarts. I might be making more in the future.
Jean | DelightfulRepast.com says
This is just the sort of thing I like! Delicious and pretty!
Analida says
Hi Jean! Thank you. I am a lover of pretty food.
Elaine says
I love this colorful fruit tart , yummy and healthy . I will try this to my family!
Analida says
Thanks Elaine. I hope your family likes it.
Have a wonderful day,
Analida
Michelle says
What a beautiful tart! And it sounds absolutely delicious too! I'm always nervous to make the crust part, but your directions sound easy enough!
Analida says
Hi Michelle!
The crust is actually very easy to make because you just kind of fit it into the pan. The texture will be "mealy", but once it is baked, it all comes together. I think you'll be fine.
Elaina Newton says
How gorgeous! I usually buy fruit tarts (or slices, to be exact) from bakeries and have never attempted a whole one at home. That apple glaze looks like something special. 🙂
Analida says
Thank you Elaina. A fruit tart is not hard to make at all. The glaze is also simple to make; I hope you give it a try.
Annie says
As far as I am concerned, there is no way you can ever top a dessert that has any type of fruit incorporated into it... this looks divine!!
Visiting from the Thank Goodness It's Monday party! Visit us sometime at MammaTech -- we are always looking for guest bloggers (AND we pay)!
Annie
Analida says
Hi Annie! Thank you. I hope you try it out, it's not hard to make at all.
I will try to visit you guys at Mamma Tech. I might be interested in guest blogging. 🙂
Ashley @ Big Flavors from a Tiny Kitchen says
This is MY kind of dessert! It's absolutely gorgeous!
Analida says
Thanks Ashley!! I think this is my new favorite.
Create With Joy says
Congrats Analida - your awesome tart is one of this week's features at Inspire Me Monday at Create With Joy! 🙂
Analida says
Thank You so much! I am so excited! 🙂
YASMIN says
This tart looks scrumptious thank you for sharing.
Tiana @ yumofchina.com says
Wow, that must be delicious, looks very nice, I should share it to my pinterest.
Analida says
Please do share! It is yummy. My co-worker's wife made one for a dinner party this past weekend. He came in today and raved about it. 🙂
Denise Wright says
Oh Analida, that is just a work of art! My mother used to make something like this but it was not a pretty as yours. I wish I had a piece in front of me right now!
Analida says
Thanks Denise! It is one of my favorites. For years I experimented with the recipe, until I finally got it. You need to make it soon! 🙂
Jenni says
This looks SOOOO good! Pastry cream + fruit is a match made in heaven! Wish I had some for an afternoon snack right now!
Analida says
Thanks for you comment Jenni! Yes, cream and fruit is HEAVEN. Hope you can make one soon! 🙂
Elaine says
Every ingredient in this recipe is simply amazing! You have done a fantastic job Analida and I just want to thank for inspiring me to make a very special weekend! 😉
Analida says
Hi Elaine, you are so kind in your compliments. This is one of my favorite desserts. I hope the patisserie tart turns out spectacularly well for you.
Kate says
Oh my gosh, yum! This looks almost too perfect to eat!
Analida says
🙂 Thanks Kate! It is so yummy. Perfect to take to any party. And,really, not too hard to make.
Mary V says
I am trying this now.... You mentioned that you can make the pastry and the cream a day ahead... I assume you keep them separate and assemble the next day? ....OR do I pour the cream mixture on the crust and refrigerate overnight and add fruit and glaze tomorrow?
Analida says
Hi Mary, keep them separate and assemble the next day. Also for the glaze, you can actually make 1/2 the recipe.
Mary V says
Awesome! Thx for the quick response. I will let you know how it came out!
Mary V says
I make this very often! It comes out fabulous every time and people just LOVE it! Thank you for such a GREAT recipe!
Analida says
You are welcome Mary! Thank you for the kind comment. I am so happy that you and your guests enjoy my Patisserie Tart. It is a favorite at our house too. 🙂
Abby @ WinsteadWandering says
This is a gorgeous tart! I would love to serve this for a fun fancy dessert.
Analida says
Hi Abby! Yes, next time you have a party, make one! Or, just make it! 🙂 Thanks for the compliment.
Mary V says
Awesome! Thx for the quick response. I will let you know how it came out!
Analida says
You are welcome. Yes, let me know how it turns out.
Mary V says
OMG! Tried it yesterday and it was an absolute HIT.... Our new fav dessert! Thank you for posting this one. You are right, half of the glaze was perfect for the whole 10" tart. We LOVED it! Our company went NUTS over it!
Everyone... TRY this one... It is SO EASY to make and really delicious!!!
Analida says
Thanks so much! I am so happy that you and your friends enjoyed it. Yes, I hope our friends and family try it out.
Marisa Franca @ All Our Way says
Now that is what I call a show stopper!! It is absolutely gorgeous and the flavor sounds wonderful. The artistic arrangement of the fruit is the ideal finishing touch. The filling is a great compliment to the fruit. I'm glad the store charged you what it did, you figured out the recipe and shared it with us.
Analida says
Thanks Marisa! It took a while to arrange the fruit to look that way, but I think it was worth it.
Yes, if the store had not hiked up the price so much, maybe I would still be buying it.:) I guess my
investigative work paid off.
Gunjan says
I love fruit based dessert. It looks so good and refreshing.
Analida says
Thanks Gunjan! If you make it, let me know how you like it.
Donna says
What am impressive treat!! This cake is just gorgeous, I wish I had a slice or two to enjoy right now with my coffee 🙂
Analida says
🙂 thanks Donna! It IS yummy, and not too hard to make. Hope you get to make one soon.
Kimberly @ Berly's Kitchen says
This is a beautiful tart! My husband loves fruit-filled desserts, so this is definitely something he'd love. I need to make this for him.
Analida says
Thanks Kimberly. Yes, make it for your husband. I hope he likes it.
Christine says
I'm always a big fan of fruit tarts, but I've actually never tried making one! This recipe looks so delicious. Would love to try it out sometime!
Christine says
I'm always a big fan of fruit tarts, but I've actually never tried making one! This recipe looks so delicious. Would love to try it out sometime! 🙂
Analida says
Hi Christine, you need to give it a try. It is very easy to make. 🙂
Julie says
These fruit tarts (minus the glaze) are my absolute favorite dessert! Totally agree on the prices being nuts at the grocery store (especially you, Whole Foods) - you did a beautiful job making your own!
Analida says
Hi Julie! My daughter doesn't like the glaze either 🙂
Yes, the grocery stores are making 300-400% profit on these tarts which really don't take too much time to make or are expensive to prepare. Thanks for the compliment.
Monica | Nourish & Fete says
This tart is just gorgeous, I love the way you arranged the fruit on top, and your suggestions for getting the cream filling just right. How great for entertaining, too, to be able to get a big head start the day before. Pinning this for sure!
Analida says
Thanks Monica! Yes, this is perfect for entertaining. It's pretty easy to make, especially because like you said, you can get a head start the day before. Thank you for pinning.
Carol Borchardt says
This is really beautiful and so artfully arranged! It sure is making me miss France!
Analida says
Thanks Carol. Yes, this would make anyone who has experienced a real French Patisserie miss France terribly. Thanks for the kind compliment.
Lylo says
Hi,
I dont have sour cream, can I use plain yoghurt instead?
Thanks
Valeria C says
How do I take the crust out of the pan? Also do i have to wait until it cools to put the filling in??
Analida says
Hi Valeria. If you have a tart pan, all you do is remove the bottom circular piece from the rest of the pan.
If you don't, then you need to cut it like you would a regular pie.
Yes, definitely wait for it to cool before you fill it. Let me know if you have other questions.
xuan says
How long can we keep the fruit tarts in fridge?
Analida says
Xuan, I would not keep it more than 24 hours in the fridge. Textures begin to change, and it is not as good. Hope this is helpful.
Anna says
Analida,
This crust is perfect!!! (And the filling, too!!) I've made this recipe 3 times now, and each time (even with oven dramas and measurement woes) the tarts came out perfectly! Thank you so, so much for sharing this fantastic recipe.
xoAnna
Analida says
Hi Anna! You are so welcome. I am so excited that you've had such success with this tart. It is fairly easy to make, and so delicious.
Sandra Rogerson says
Just wondering if I can make the night before and refrigerate? I looks delisiouos !
Sandra
Analida says
Sandra, you can make the crust, slice the fruit, and the filling the night before. I would not put them together. Assemble on the day. Also make the glaze the day you are serving. Hope this helps.
Dennis says
On step 3, when you say to blend the heavy cream for 2 minutes in a stand up mixer, do you mean something like a kitchenaid stand mixer? If so, would the whisk attachment or beater attachment be preferable? Is the goal to make whipped cream essentially? Thanks!
Analida says
Hi Dennis! Yes, I mean like a Kitchenaid stand mixer. You do need to use the whisk attachment because in essence you are making whipped cream. You are so welcome. Thanks for asking. 🙂
Mrs. Schaffer says
I am new to baking, pastries, and desserts other than some simple cookies and a good cake. I cannot thank you enough for making this recipe easy enough for someone like me. I felt so proud after making it. I made it for a dinner party and received so many compliments on it, thanks to you and your lovely recipe. Your recipe was easy to follow and not only did it turn out incredibly delicious but beautiful too. You have inspired me to be braver in the kitchen. You said it took you a little to get it right and sometimes I forget that trial and error are what make us better bakers. I was a little intimidated to try something like this but am so glad I found you! Thank you again.
Analida says
Hi Mrs. Schaffer! Thanks so much for commenting. I am so happy you like the French patisserie fruit tart, and that it turned out so well for you. I am also glad you thought that the recipe was easy to follow, I always strive for that. I am so excited that you want to try more recipes. Indeed trial and error are key! I am also glad your guests enjoyed it. 🙂 Thanks again for the compliments. Have a nice evening.
Haley Odom says
Hi, totally new to baking so I thought this crust would be more technically difficult. Bookmarked your recipe over a month ago because I want to make this for Easter. Well, today I made my first practice run! Before I even put it in the oven I was perplexed as to how to press it evenly, especially along the sides. I've made dozens of cheesecakes so I've pressed in crusts before, but obviously this is much finer of a crust & the pan less forgiving. It came out as I thought it would: uneven, browned & cracked close to the middle in an area of about 4 inches. The sides: uneven, crumbling, breaking everywhere. I'm gonna put cream in it anyway since it's just for the husband & kids.. but I have a week to perfect this or I need to change plans! Thanks for listening, please advise!
Analida says
Hi Haley! I would be happy to give you some advice. When you are packing the crust, make sure that you leave the sides a bit thicker. It will shrink a bit. Also, I use a tart pan with a removable bottom. It makes things much easier. Does this help?
Shaun says
I came across this recipe yesterday and wanted to give it a shot. I made it for my family Easter brunch and it was fantastic. I had some slight cracking of the crust but nothing severe. Everyone was super impressed and they were only sad I didn’t make a second one. Thank you so much for your work with this.
Analida says
You are welcome Shaun! I am so happy that you and your guests liked it. Yes, this is a very impressive dessert, and it is not that difficult to make. So glad it turned out well for you. Happy Easter to you and yours.
Brooke Francev says
Hi there. I recently modified this recipe to individual mini tarts for a work luncheon and it was a big hit. Definitely plan to make this again. I did have some trouble with the cream and ended up tossing an entire batch after the cream cheese wouldn't fully incorporate and the whipped cream got super overwhipped while I was still trying to get it all mixed in. Second batch I altered the order of ingredients as they were added to the mixer and it turned out beautifully. Instead of starting with the cream, I started with the cream cheese. Creamed that with the vanilla, sour cream, and sugar until smooth then added the heavy cream and whipped for approximately 2 minutes. The cream whipped up perfectly even after incorporating into the cream cheese. Just wanted to share in case anyone else ran into the same problem I did.
Analida says
Thanks for sharing your method for making the cream, and how it helped you achieve success. Actually I really like your method. I am so glad that your co-workers liked the mini tarts. I have often thought of doing the same, and taking a batch into work. 🙂
Jessica says
Was I supposed to leave the crust attached to the bottom of my tart dish and serve it from there? That was unclear and I didn't want to use a knife on it so I took if off but it crumbled in places. With the filling I would follow the advice of the other reviewer who creamed the cream cheese first until smooth. I did that and then washed the bowl out, whipped the heavy cream, then mixed the cream cheese, sour cream, vanilla, sugar mixture with the whipped cream just until mixed. Lastly, I assembled this at home (looked beautiful) and then took to work with me (25 min commute) but when I got there it was beginning to melt so I think another important point would be to assemble not only day of but perhaps right before. The taste is nice but I didn't seem to find this recipe as easy as it looked. Also, I skipped the glaze just due to my own preference.
Analida says
Jessica: The crust is left attached to the tart. The advice of the other reviewer is very good, and I would certainly follow it. It is good advice to make it right before especially if you are traveling with the dessert. No problem on the glaze. Thanks for the input.
Jess @ Allore foodies says
I just love a vibrant fruit tart like this one. This looks so good Analida, thank you for sharing.
To change it up, I like to make it with refreshing citrus fruits.
Analida says
Jess, citrus fruit is a great idea, especially for the summer months.
Rocco Camarillo says
The traditional French fruit tart does not have cream cheese. The cream cheese adds a lot of calories. The true French fruit tart uses Bavarian cream for the filling and a pate sucreé for the bread.
Analida says
My French friend from Rennes saw the recipe and said it can be done this way as well. I will have to give it a try with Bavarian cream.
Robin says
I'm excited to try this recipe! When you make the crust and filling ahead, should they both be refrigerated until assembled? And after you assemble the fruit the day of, should it be refrigerated until served?
Analida says
Yes, make the crust, filling ahead and refrigerate. Do not add the filling until you are ready to assemble and serve. A removable bottom tart pan works really great too when plating on a platter.
Rebecca D says
About to attempt this! Quick quesiton: do you grease your tart pan first? if so, what with? thank you!!
Analida says
Hi Rebecca,
I always use a non-stick tart pan with a removable bottom and I have never had a problem with it sticking. If you do not have a non-stick tart pan I would give it a quick spray with a non-stick spray. The removable bottom makes it so easy to move to a serving plate. Let me know how you like it.
Analida
Cheri Plaza says
What kind of apple juice would you suggest? Fresh cold pressed, organic, from concentrate, sweetened or without added sugars?
Analida says
Hi Cheri, thanks for the question. I typically use unsweetened organic apple juice but you are going to add 1/4 cup sugar to make the glaze. You want to just lightly brush the glaze over the top of the tart. Enjoy!
Nicole says
This turned out wonderfully! I was worried this would be more difficult than I had bargained, but that was not the case. It was beautiful and tasty, and I will certainly be making this again. Thank you for such a fun and easy-to-follow recipe!
Analida says
Hi Nicole! I am so happy to hear you like the tart. I really worked hard to make this an easy and approachable recipe. Thanks so much for your compliment!
Mary V says
I have made this DOZENS of times now! Easy! I make the shell the day before and keep in a cake holder at RT (do not over bake), and I make the cream the day before also and put in container in fridge. The next day I fill tart with cream, start making glaze, and in the 10 min it's cooling I arrange the fruit. Voilà!!! People are always asking me to make these. I do put a little more fruit than the pic shows... I LOVE this so much.
Analida says
I love your process to make the shell and cream in advance! Thanks for sharing!