

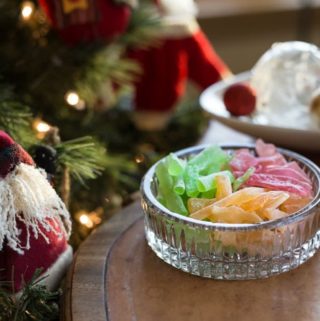
Old-fashioned hard candy is a colorful Christmas tradition made by cooking sugar, water, and corn syrup to the hard-crack stage, then adding concentrated flavoring and food coloring. Once cooled, the glossy candy is broken into bite-size pieces and dusted with powdered sugar.
We made this candy every Christmas in flavors like orange, raspberry, watermelon, spearmint, and cinnamon. It's inexpensive to make in large batches and is perfect for filling Christmas candy dishes or packaging in festive bags for homemade holiday gifts.
The most important part is temperature: the sugar syrup must reach 300°F for the candy to cool hard and brittle instead of soft and sticky.
One of my favorite things to do around the Holidays is making old fashioned hard candy. The house smells so good, and your friends love you for the gift.
Two caveats:
- Cover every square inch of your countertops in newspaper topped with aluminum foil, and line your stove with heavy-duty foil.
- Wear long pants, closed-toed shoes, and long sleeves.

- 🍬 What is it? Old-fashioned hard candy is a classic Christmas treat made by cooking sugar syrup to the hard-crack stage, adding concentrated candy flavoring and food coloring, then breaking the cooled candy into colorful pieces.
- ❤️ Why you'll love it? With just a few inexpensive ingredients, you can make batches in different colors and flavors for Christmas candy dishes, teacher gifts, hostess gifts, and holiday parties.
- 👩🍳 How do you make it? Cook sugar, water, and corn syrup to 300°F, adding food coloring near the end of cooking. Remove the syrup from the heat, carefully stir in the flavoring oil, then quickly pour it into powdered-sugar troughs. Once completely cool, break the candy into bite-size pieces.
A sweet backstory
I learned to make this candy from my sister-in-law. When I was first married, she invited me to a candy-making party at a co-worker's house. These ladies got together every year, the first weekend in December, to make roughly 20 batches of old-fashioned hard candy.
We made tons of fruit flavors, plus a couple of mints, and even cinnamon, which is strong but delicious. It was a fun event, and one that I always looked forward to. Every once in a while Mother Nature would humor us with a few snow flurries while inside the warm kitchen, candy syrup boiled away, and Christmas carols played in the background.
Candy revival
It's been about 5 years since I last made candy. So, what's the occasion you might ask. Well my daughter came home for a visit and specifically asked: Can we make candy when I come home? Well, of course. We spent a cold morning making 4 batches: orange, watermelon, raspberry, and spearmint. It was so much fun, and we did not even make that big of a mess. After years of making old-fashioned hard candy, I learned a thing or two about keeping the mess to a minimum.
Why you'll love this recipe
- Made with just a few inexpensive ingredients
- Easy to customize with different flavors and colors
- Perfect for making several batches at Christmas
- A nostalgic homemade candy that looks beautiful in a holiday candy dish
- Easy to package in festive bags or jars for homemade Christmas gifts
- Includes practical candy-making tips learned from years of making multiple batches at a time
Key ingredients to make old-fashioned hard candy
- Sugar: Granulated sugar forms the base of the candy and becomes hard and glass-like when the syrup reaches the hard-crack stage.
- Light corn syrup: Corn syrup helps prevent the sugar from crystallizing as the candy cooks and cools.
- Water: Water allows the sugar to dissolve evenly. Most of it boils away as the syrup reaches 300°F.
- Candy flavoring oil: Concentrated candy flavoring provides the flavor without adding too much moisture. I use LorAnn Super-Strength flavoring oils and use one 1-dram bottle per batch.
- Food coloring: Use just a few drops to coordinate the candy's color with its flavor. Add liquid coloring before the syrup reaches its final temperature so the added moisture has time to cook off.
- Powdered sugar: Powdered sugar is used to form the troughs for pouring the hot candy and helps keep the finished pieces from sticking together.
Important safety tips before making hard candy
- Hot sugar syrup can cause serious burns, so prepare your work area before you begin.
- Wear long sleeves, long pants, and closed-toe shoes.
- Keep children and pets away from the stove and pouring area.
- Have your baking sheets, powdered-sugar troughs, flavoring, coloring, and heatproof pitcher ready before the syrup reaches 300°F.
- Use a reliable candy thermometer and avoid touching or tasting the hot syrup.
- Be especially careful when adding concentrated flavoring to the hot candy because steam can rise quickly from the mixture.
Why 300°F matters for hard candy
Hard candy needs to reach the hard-crack stage, about 300°F, so enough water evaporates from the sugar syrup for the finished candy to become hard and brittle.
Be patient as the syrup heats. I've noticed that around 220°F the temperature can seem like it has stopped climbing, but once it moves past that point it can rise toward 300°F surprisingly quickly. Stay near the stove and watch the candy thermometer closely.
Remove the pan from the heat as soon as it reaches 300°F. The syrup will continue heating slightly from residual heat, and cooking it too far beyond the hard-crack stage can cause the sugar to begin caramelizing.
Tips for success
- Organize all the flavors and batches you want to make ahead of time.
- Have a large pot of water simmering on the stove to help rinse off the syrup from the pots and pyrex
you use. This is incredibly helpful since hardened syrup is almost impossible to remove from a pot.
- To transfer flavored syrup to the sugar troughs, pour syrup in a 4-cup heat-proof glass container that has been sprayed with canola oil.
- To form the candy strips, place a good amount of powdered sugar on a cookie sheet, then make troughs using a thick plastic hanger. This helps you make somewhat even-sized pieces.
- For one batch, you should have 3 cookie sheets prepared. I use a baking sheet
with 15.25" x 10.5" x .75" as shown below.
- As soon as you empty the syrup onto the troughs, place the glass container in the simmering pot. This will dissolve the residual candy and get the glass container ready for the next batch.
- Organize all the flavors and batches you want to make ahead of time.
- After the candy cools, pull it from the troughs and break it into pieces. Smooth out the powdered sugar and make new troughs for the next batch with the plastic hanger.

How to make old-fashioned hard candy
- Step 1: Prepare three baking sheets with a generous layer of powdered sugar. Use a thick plastic hanger or similar utensil to press long troughs into the sugar.
- Step 2: Combine the sugar, water, and corn syrup in a heavy saucepan. Cook over medium heat, stirring initially until the sugar dissolves.
- Step 3: Attach a candy thermometer and bring the syrup to a boil. Once it begins boiling, avoid stirring.
- Step 4: When the syrup reaches about 260°F, add 3-4 drops of food coloring. Continue cooking until the syrup reaches 300°F, the hard-crack stage.
- Step 5: Immediately remove the pan from the heat. After the boiling settles, carefully stir in one 1-dram bottle of concentrated candy flavoring.
- Step 6: Spray a heat proof glass pitcher with canola oil and pour the hot candy into the pitcher. Carefully transfer the hot syrup to a heatproof pitcher and quickly pour it into the powdered-sugar troughs before it begins to harden.
- Step 7: Allow the candy to cool completely, then lift the strips from the powdered sugar and break them into bite-size pieces.

Visual reference above 1-4
- Boiling the syrup on the stove with a candy thermometer.
- Making troughs in the powdered sugar with a wide clothes hanger.
- Pouring the candy into the troughs.
- Cooled candy broken into pieces.
How to store old-fashioned hard candy
Allow the candy to cool completely before storing it. Keep old-fashioned hard candy in an airtight container at room temperature in a cool, dry place.
Moisture is the enemy of hard candy. Humidity can make the surface sticky, so don't refrigerate it-the temperature change can cause condensation to form on the candy.
If you're packaging the candy for Christmas gifts, keep it tightly sealed until you're ready to give it away.
Frequently Asked Questions:
You should store it in an airtight container at room temperature. Never store it in the refrigerator.
If properly stored, it will last 12 months in a sealed container. If you have a large amount to store, you can place it in a 32 oz. mason jar or larger. Take a small zip-top snack bag and put ¼ cup rice in the bag, seal it, and poke some small holes in it. Toss this in the bottom of the jar before adding the candy. This will absorb any moisture and keep the candy fresh longer.
Hard candy usually stays soft or becomes sticky because the sugar syrup didn't reach the hard-crack stage or because the finished candy absorbed moisture from the air. Cook the syrup to 300°F using an accurate candy thermometer, allow the candy to cool completely, and store it airtight in a cool, dry place.
Sugar crystallization. Avoid stirring once boiling begins and keep crystals from accumulating on the side of the pan.
Absolutely. That's one of this recipe's strengths. I have made: orange, watermelon, raspberry, spearmint, cinnamon and sassafras.
More Christmas treats from around the world
If you're planning your Christmas baking, try a few more holiday treats from around the world. German lebkuchen are soft and chewy spice cookies finished with chocolate, Greek melomakarona are orange-spiced cookies soaked in honey syrup, and Italian panforte is a dense Christmas cake filled with nuts, dried fruit, honey, and spices. Lithuanian tinginys is an easy no-bake chocolate dessert that's perfect for making ahead, while Irish butter cookies are a simple buttery favorite for Christmas cookie trays.
📖 Recipe
Old-Fashioned Hard Candy (Christmas Candy)
Ingredients
- 2 cups sugar
- 1 cup water
- ¾ cup corn syrup
- 3.7 ml spearmint oil (use other oils for each flavored batch)
- food coloring as needed
Instructions
- Place powdered sugar in baking tray with side and make long troughs with a thick plastic clothes hanger. These are usually about 18 inches long depending on the tray and ¾ inch deep and ¾ inch wide. Each batch will use about three sheets prepared.
- In a heavy pan, mix sugar, water and corn syrup. When the syrup reaches about 260°F, add 3-4 drops of food coloring. Continue cooking until the syrup reaches 300°F, the hard-crack stage.
- Remove from heat, and stir in the flavored oil. Use 1 bottle of flavor oil per batch. (1 dram, 3.7 ml or .125 oz.)
- Transfer contents to glass heat proof container that has been sprayed with canola oil.
- Slowly pour contents into the troughs.
- Allow the strips to cool, then break apart and place in containers. I like to place different flavors in different containers.
Notes
Tips for success
- Organize all the flavors and batches you want to make ahead of time.
- Have a large pot of water simmering on the stove to help rinse off the syrup from the pots and pyrex
- To transfer flavored syrup to the sugar troughs, pour syrup in a 4-cup heat-proof glass container that has been sprayed with canola oil.
- To form the candy strips, place a good amount of powdered sugar on a cookie sheet, then make troughs using a thick plastic hanger. This helps you make somewhat even-sized pieces.
- For one batch, you should have 3 cookie sheets prepared. I use a baking sheet
- As soon as you empty the syrup onto the troughs, place the glass container in the simmering pot. This will dissolve the residual candy and get the glass container ready for the next batch.
- Organize all the flavors and batches you want to make ahead of time.
- After the candy cools, pull it from the troughs and break it into pieces. Smooth out the powdered sugar and make new troughs for the next batch with the plastic hanger.
Frequently Asked Questions:
- How do I store my hard candy? You should store it in an airtight container at room temperature. Never store it in the refrigerator.
- How long can I store the candy? If properly stored it will last 12 months in a sealed container. If you have a large amount to store, you can place it in a 32 oz. mason jar or larger. Take a small zip top snack bag and put ¼ cup rice in the bag, seal and poke some small holes in it. Toss this in the bottom of the jar before adding the candy. This will absorb any moisture and keep the candy fresh longer.
Nutrition
Elaine Benoit says
That is so fun! I love the back story about making candy! I bet this would be fun to do with older kids and would create awesome memories! And the candies look delicious!
Dawn says
I can't recall ever making my own candy, but what a lovely idea! It surely would make for a yummy homemade foodie gift 🙂
Analida says
This makes a nice Christmas party gift for the host and I like to pack it in those festive plastic bags.
Gloria says
WOW what a great recipe. I have never made candy like this. Perfect as a food gift....especailly for all the teachers on your Christmas list.
Analida says
Oh yes, the teachers love these sweets tied up in those cute Christmas bags with a ribbon!
Renee Gardner says
This sounds like such a fun project! Your explanation makes candy making seem a lot less intimidating than I would have expected. Thank you for sharing such detailed information.
Wendy says
I remember getting invited to make candy with your family many years ago. It was so much fun. Sassafras flavor was my favorite kind.
Analida says
Those were great times making candy for Christmas!
Amy says
What a fun treat! My kids would love making this with me! Thanks for the recipe!
Cynthia says
Candy making party? You are giving me ideas! I love sweets but have never attempted to make my own; this looks like it would be a very thoughtful Christmas gift 🙂
Analida says
When we would get together we would do around 20 batches of different flavors and then split them up at the end of the day. We saved cinnamon for the last batches because it was so intense.
Ruchi says
This hard candy will never be out of time! Great for holidays or just because its so yummy!
Leslie Haasch says
I don't have any kids I could make these with, but that sounds like fun so maybe I'll borrow a friends' kids for the day! haha
Carrie Ditton says
Oh my goodness my father LOVES old-fashioned hard candy. I have always been afraid to try making it but after this post and with this recipe...my daughter and I are going to make him some for the holiday season!
Analida says
It makes for a really fun day in the kitchen and you can get tons of flavors.
Amanda M Mason says
What a fabulously fun post! I love that you daughter requested that you guys make this together! This looks like a lot of fun! I'd love to start this tradition with my kids!
Saima says
What a fun recipe! Never thought of making my own candy and I love your tips on keeping the mess to a minimum. Like your detailed steps too so there's no confusion.
Sues says
Oh how fun!! Thank you for this great tutorial- I can't wait to make this for the holidays!
Georgie says
I love old fashioned candies!! These look great and bring back great memories!
Marisa Franca says
This is a terrific recipe to have during the holidays!! I've made hard candy before but it's been so many years that I don't remember the recipe. You certainly give some good tips so I'll have to give the hard candy a try.
Analida says
Thanks Marisa! Let me know how you like it. I used to try to pour it onto candy molds but that became too much fuss. The powdered sugar troughs work great.
Natalie says
These are so festive and great for upcoming Holidays. I actually didn't have idea candies are made this way. I might give it a try. Thanks for clear instruction with pictures.
Jenni says
I just made this and it turned out wonderfully! I'm so excited to make more.
Analida says
It would make a nice Easter treat too! I am so glad you wrote me back about your candy making experience.
Elaine says
Can I add extra flavoring to this ? I like it stronger.
Analida says
Hi Elaine, I alway use: 1 fluid dram size (3.7 ml, or .125 fluid oz.) which is one little bottle per recipe batch. I have never added more to a batch but feel free to experiment by adding more to a batch and see how you like it. I find that the cinnamon flavor is strong enough so I would go easy on that one unless want atomic fireball candy. Enjoy!
Ethan says
This recipe sounds lovely! Would it be possible to use flavor extracts instead of oils? I was planning to make mango candy for my father, but all I have on hand is the extract.
Analida says
I have only ever used the oils. I did some searching on this and this is what I found.
Candy oil actually means the flavor is concentrated and undiluted-being 3-4 times stronger than extracts. If a recipe calls for 1 teaspoon of extract you'd only need 1/4 to 1/2 teaspoon of candy oil.
You might need a lot more extract to get the flavor. Enjoy!
Ethan says
Thank you so much! I did end up using quite a bit of extract, it turned out great! (If a little less strong than hard candies typically are, haha)
Analida says
I am so glad it worked out and that I could help!
Gwynn says
This recipe was s easy to make and I love that I can change up the flavor with different oils!
Analida says
Thanks Gwynn! We make big batches of different flavors and give them as gifts!
Amy Liu Dong says
Wow, it’s been a while since I saw candies like this! Thanks for sharing this recipe!
Analida says
These candies are a lot of fun to make and the house smells great!!!
Amy says
What great memories this recipe brought back. I stumbled upon it and it reminded me of the recipe we made as kids. I like how you made it in long pieces - it made the perfect size.
Analida says
Thanks Amy! Candy making is a Christmas tradition for us!